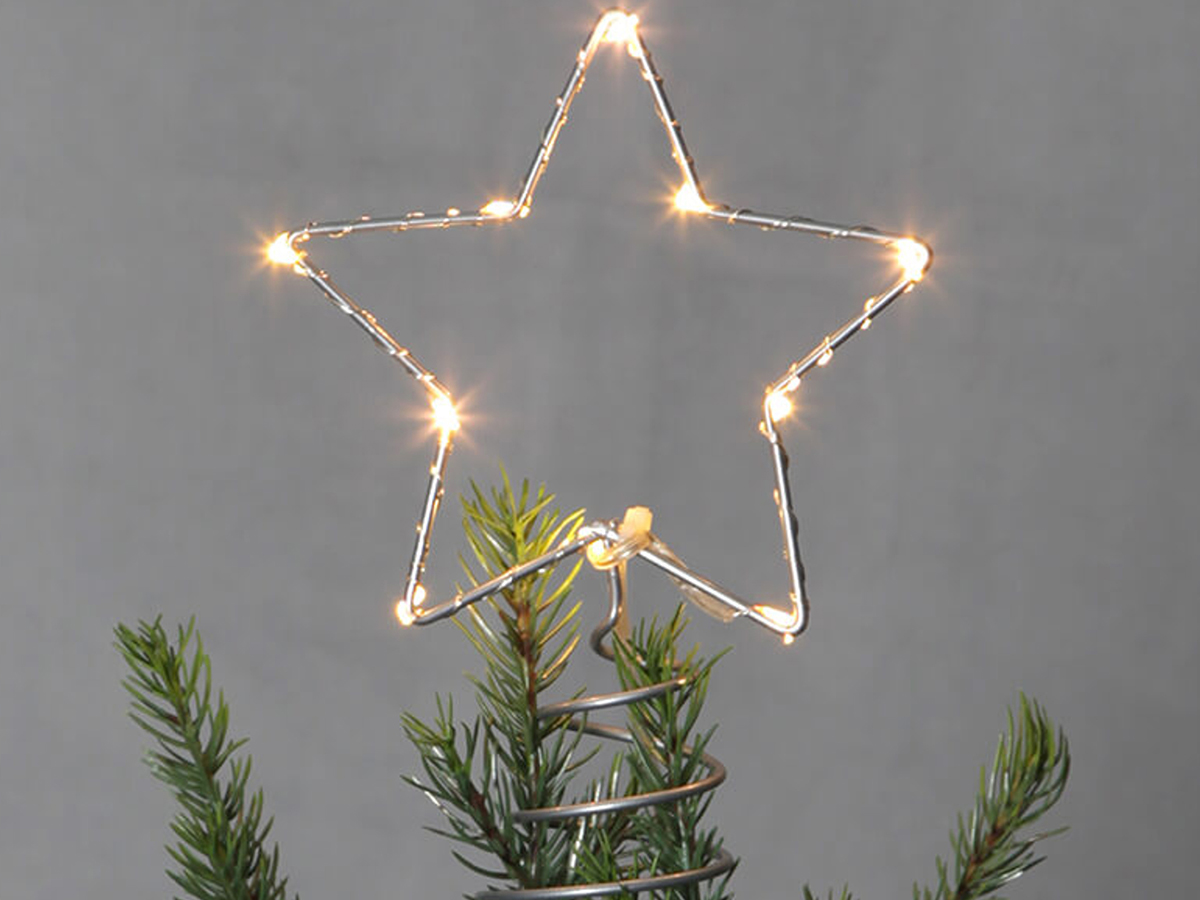
Christmas Tree Topper: Here’s how to build a star-shaped one with creative DIY art. Amaze your guests with this personal and original idea and very quick to implement. Yields, materials, instructions and steps to build a star for the tip of the Christmas tree.
The trepidation of climbing the stairs to the attic knowing that, finally, after 365 days we can reopen the boxes on which the word Christmas is headed or tree decorations is one of those sensations of joy mixed with that pleasant shiver that starts in the stomach and passes, one by one, all the nerves of the body.
To decorate the tree of Christmas it is not an end in itself: it encompasses the whole sense of being together, of sharing of a moment magical which, unrepeatable in its annual repeatability, puts everyone in a good mood, young and old. Lost among flashing lights, angel wires and decorative balls, like skilled geometers we try to place all in the right place so that the tree is full but at the same time it tells something about us and our family.
Read also: Making the tip of the Christmas tree do it yourself: our ideas
Inevitable, the ferrule. On the market there are all kinds, some a bit kitschy, various forms, size is colors. But, by now you will have understood it, as faithful devoted to the creative DIY art today we want to offer you an innovative and whimsical recipe whose final dish is as personal as it is very beautifull ferrule. Not any one, but one in the shape of a star.
So, in this easy tutorial we will explain, step by step, how realize in a simple way (but very impressive) one star to be placed on the tip of your Christmas tree.

Star-shaped tip: required
For create your beautiful star which, as tradition dictates, you will have to put on the tree the smallest of the house, vi will serve very little material namely:
- a wire of copper or a wire covered in green rubber and about 60/70 cm long (attention: the wire must be wide enough to be able to support the shape we are going to give it)
- a series of 20/25 Christmas lights
- sheet of paper
- pencil
- felt tip pen double pointed
- cable tie of plastic or wire of nylon

Star-shaped tip: steps for making
Once you have all the material you need, you can move on to real realization. Follow these steps:
- Draw on the sheet of paper la Shape of a star and go over the edges with a double-pointed marker. Do not exceed in size otherwise the tip could be too large and therefore disproportionate, our advice is to stay around the 25 cm for both the height and the width of the star;
- When you are satisfied with the drawing, with a colored marker you will go to mark the points where the iron wire, or copper, it will be folded: that is on the 5 star points. This step will make the work of the next steps much easier;
- At this point, take the wire or copper wire and start at shape it following model shaped that you have developed on the sheet of paper. If you notice that the wire is too thin you can use two of them together in order to thicken the structure and therefore give it greater resistance.
- When you have modeled all five tips, you will need to to achieve a small spiral with the excess thread: this will form the support when you place the star at the tip of the tree;
- At this point, if you have followed all the steps well, you should have ready the template with the wire. Now, all you need to do is weave the string of colored lights around the silhouette. As mentioned, if you have respected the dimensions, you will need a series of about 20 or 25 lights, fixed or intermittent according to your tastes
- Following the outline of the star outline you will have to fix every lucina with a cable tie plastic or nylon thread. Our advice is to fix a lucina on every corner, in this way the star shape will be highlighted by the lights;
- At this point your very personal ferrule in the shape of a star it’s ready. But remember the spiral of iron or copper wire what did you leave in making the last tip? Well: wrap that spiral, putting some pressure, around the branch higher of the tree, thus the star should be well fixed and be able to stand up alone.

You may be interested in: 3 ideas to build the Christmas tree topper
Star for the tip of the Christmas tree: conclusions
This one just saw is a project to be able to develop together with smaller ones because really simple to make. We are of the idea that an object, in its simplicity, if made with one’s own hands acquires a different aura that does not really have a price. So, roll up your sleeves and open yourself to the art of DIY!

Star-shaped tip: images and photos
Be inspired by the images in the gallery below and let yourself be conquered by the magical spirit of Christmas.
Do you want design advice on how to furnish? Join the group
Christmas Tree Topper: Here’s how to build a star-shaped one with creative DIY art. Amaze your guests with this personal and original idea and very quick to implement. Yields, materials, instructions and steps to build a star for the tip of the Christmas tree.

The trepidation of climbing the stairs to the attic knowing that, finally, after 365 days we can reopen the boxes on which the word Christmas is headed or tree decorations is one of those sensations of joy mixed with that pleasant shiver that starts in the stomach and passes, one by one, all the nerves of the body.
To decorate the tree of Christmas it is not an end in itself: it encompasses the whole sense of being together, of sharing of a moment magical which, unrepeatable in its annual repeatability, puts everyone in a good mood, young and old. Lost among flashing lights, angel wires and decorative balls, like skilled geometers we try to place all in the right place so that the tree is full but at the same time it tells something about us and our family.
Read also: Making the tip of the Christmas tree do it yourself: our ideas
Inevitable, the ferrule. On the market there are all kinds, some a bit kitschy, various forms, size is colors. But, by now you will have understood it, as faithful devoted to the creative DIY art today we want to offer you an innovative and whimsical recipe whose final dish is as personal as it is very beautifull ferrule. Not any one, but one in the shape of a star.
So, in this easy tutorial we will explain, step by step, how realize in a simple way (but very impressive) one star to be placed on the tip of your Christmas tree.

Star-shaped tip: required
For create your beautiful star which, as tradition dictates, you will have to put on the tree the smallest of the house, vi will serve very little material namely:
- a wire of copper or a wire covered in green rubber and about 60/70 cm long (attention: the wire must be wide enough to be able to support the shape we are going to give it)
- a series of 20/25 Christmas lights
- sheet of paper
- pencil
- felt tip pen double pointed
- cable tie of plastic or wire of nylon

Star-shaped tip: steps for making
Once you have all the material you need, you can move on to real realization. Follow these steps:
- Draw on the sheet of paper la Shape of a star and go over the edges with a double-pointed marker. Do not exceed in size otherwise the tip could be too large and therefore disproportionate, our advice is to stay around the 25 cm for both the height and the width of the star;
- When you are satisfied with the drawing, with a colored marker you will go to mark the points where the iron wire, or copper, it will be folded: that is on the 5 star points. This step will make the work of the next steps much easier;
- At this point, take the wire or copper wire and start at shape it following model shaped that you have developed on the sheet of paper. If you notice that the wire is too thin you can use two of them together in order to thicken the structure and therefore give it greater resistance.
- When you have modeled all five tips, you will need to to achieve a small spiral with the excess thread: this will form the support when you place the star at the tip of the tree;
- At this point, if you have followed all the steps well, you should have ready the template with the wire. Now, all you need to do is weave the string of colored lights around the silhouette. As mentioned, if you have respected the dimensions, you will need a series of about 20 or 25 lights, fixed or intermittent according to your tastes
- Following the outline of the star outline you will have to fix every lucina with a cable tie plastic or nylon thread. Our advice is to fix a lucina on every corner, in this way the star shape will be highlighted by the lights;
- At this point your very personal ferrule in the shape of a star it’s ready. But remember the spiral of iron or copper wire what did you leave in making the last tip? Well: wrap that spiral, putting some pressure, around the branch higher of the tree, thus the star should be well fixed and be able to stand up alone.

You may be interested in: 3 ideas to build the Christmas tree topper
Star for the tip of the Christmas tree: conclusions
This one just saw is a project to be able to develop together with smaller ones because really simple to make. We are of the idea that an object, in its simplicity, if made with one’s own hands acquires a different aura that does not really have a price. So, roll up your sleeves and open yourself to the art of DIY!

Star-shaped tip: images and photos
Be inspired by the images in the gallery below and let yourself be conquered by the magical spirit of Christmas.
Do you want design advice on how to furnish? Join the group

